My last post about Panamax showed how to get started quickly with it in OS X, now let’s go ahead and look at why Panamax is an awesome tool and showcase one of it’s main strengths; Templates!
If you look at the really long list of all Docker images that exist out there, you will see that many are one of two things:
- Multi-app images where everything needed to run a service is baked in
- One-app images that aren’t connected to anything else
There are problems and benefits with both. The multi-app images are usually full of all needed dependencies and configurations for an app and don’t adhere to the “12 Factor App” rules, but they’re great if you just want to try out a new tool or app without having to invest too much time.
The one-app images are usually adhering to the “12 Factor App” rules when looking at isolating code, but they usually lack in the documentation of how to actually connect this specific containerized app to another app. Think of it as having a database in a container without any documentation on how to connect a web server app to it. Not really useful.
This is where Panamax really shines. The templates within Panamax actually connect regular one-app images with a really easy to read and use fig-like construct, to make sure we can have a system of isolated apps where the parts can be exchanged, modified, increased and decreased (think web scale HA environments for instance). Pretty awesome!
So, how do you use it? I’ll try to explain using an app template I created for the Panamax App Template challenge, “Sensu with separate Redis, RabbitMQ and Uchiwa” consisting of the following containers:
When creating this new application template within Panamax, do the following:
Search for redis which will be used as the key-value store for Sensu:
Choose to run the redis image:
Verify that redis starts running in your new application under “application services”. You can change the name of you application from “redis:latest_image” to something more useful if you’d like, same with the category from “Uncategorized” to something else:
And to make sure we have an easy to understand application, let’s use the awesome “categories” function. Create a new category for the “GUI” where we’ll add the Uchiwa image in just a bit:
Click to add a service to it, search for the correct Uchiwa image and add it to the app:
Repeat these steps to create categories and services for Sensu and RabbitMQ, and you’ll end up with something like this:
Cool! Now we have a bunch of containers running in one application construct, but we’re not done yet. Now we can start connecting them together :)
Click the magnify glass icon on the RabbitMQ image to enter another dimension of what Panamax can do:
What you’ll now be presented with is a vast array of configuration options available for this image, especially which ports we want to publish to other containers and how we can actually connect them together:
Make sure you expose the correct ports for each image:
- RabbitMQ: 5672, 15672
- Redis: 6379
- Sensu: 4567 (I’m not making this one up :))
- Uchiwa: 3000
Ok, nice, now you’ve opened up the ports so that the apps can actually talk to each other. But they don’t, yet. Let’s get to that now!
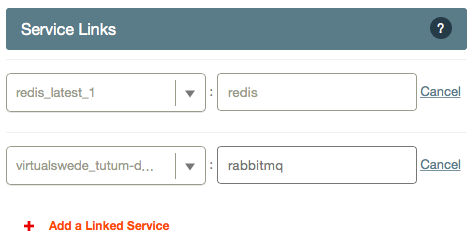
On the Sensu service, add the redis and rabbitmq images as two “linked services” like this:
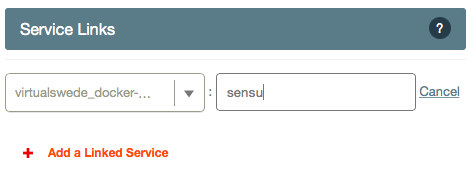
On the Uchiwa image, do the same but this time link it to the Sensu image:
When you’re finished, go back to the application screen and click the little link icon on the right corner. You should see something like this:
Whoho! You have now created an application template! You’ve added 4 Docker images that each perform an important task, you’ve exposed ports on some of them and you have linked them together. You’re pretty great, you know that?
Now let’s actually access this application, add a port binding for Uchiwa and link it to the already exposed container port:
After that, run the following command in your preferred terminal:
VBoxManage controlvm panamax-vm natpf1 rule1,tcp,,8997,,8080
Now you can point your browser to http://localhost:8997 and you’ll be able to to see the Uchiwa GUI, connected to the Sensu API, storing information in Redis and RabbitMQ. Awesome work, dear reader!
Now this template can be saved into Github so you can share them with your fellow colleagues, partners, customers etc, just follow the instructions outlined here. Have fun!


