GitHub has created a really interesting bot called Hubot that can be used for many different things. It can connect to a multitude of different services such as IRC, Slack, HipChat, Twitter, and a lot more. Once it is there it can respond to different queries such as showing you maps, translate sentences, post cute images of pugs and even deploy applications for you. Yes, you read that right, you can use a bot that posts pictures from Reddit’s AWW to also deploy your services on Heroku, AWS etc.
In these blog posts I’m gonna walk you through how you can run your Hubot on CloudFoundry, but not only that, we’ll have it connect to Slack for awesome chatops functionality and finally we’ll automate deployments of it using GitHub and Travis CI. I expect that you already have the command line tools git and cf cli installed and know how to use them. Alright, let’s get started!
First, let’s grab Hubot and make sure you go through the Getting started with Hubot guide all the way down to the Scripting part, you can stop there. Now you have Hubot up and running but it’s on your local machine, and of course you’d like to run it somewhere else. This is where services like CloudFoundry comes in, and it is actually very simple to get your currently stranded bot up into the PaaS of your dreams, all you need to do is the following:
cf push yourbotname
Voila! Your bot is now up and running on CloudFoundry, but it won’t connect to any services. Luckily this is easily mitigated by looking at all the different connection adapters that are available for it, and we’ll use Slack as the example for this blog post. If you’re not already using Slack or something similar for team and project communications you’re definitely missing out and should start immediately :)
Troubleshooting: If your bot is named something that has already been taken as a CloudFoundry route, it won’t deploy. We’ll look into that in the next blog post but for now just name it something random.
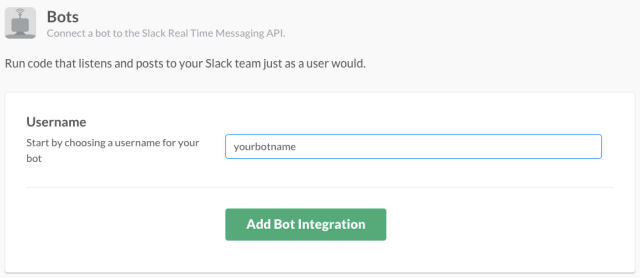
To connect your Hubot to Slack, first go to https://yourteamnname.slack.com/services/new#diy and choose to connect a Bot:
Then choose a name for your bot:
Then you’ll be presented with an API Token, copy this as we’ll use it to set up your bot to connect to Slack correctly.
Alright. Now time to change your bot to use the Slack adapter. The easiest way of doing this is to run the following:
yo hubot
Change the “Bot adapter” from campfire to slack, and press Y to overwrite the Procfile and package.json
Now let’s also set the correct environment variable for our bot so it knows what Slack team to connect to:
cf set-env yourbotname HUBOT_SLACK_TOKEN xoxb-11222211122-B2qPnCLi0WxSxtqMS3CRET
Now do another push so the changes we’ve made are live:
cf push yourbotname
You should now see something like this:
cf logs yourbotname --recent
<snip>
2015-02-18T12:30:32.11-0500 [App/0] OUT [Wed Feb 18 2015 17:30:32 GMT+0000 (UTC)] INFO Logged in as yourbotname of YourTeamName, but not yet connected
2015-02-18T12:30:32.21-0500 [App/0] OUT [Wed Feb 18 2015 17:30:32 GMT+0000 (UTC)] INFO Slack client now connected
2015-02-18T12:30:32.36-0500 [App/0] OUT [Wed Feb 18 2015 17:30:32 GMT+0000 (UTC)] ERROR hubot-heroku-alive included, but missing HUBOT_HEROKU_KEEPALIVE_URL. `heroku config:set HUBOT_HEROKU_KEEPALIVE_URL=$(heroku apps:info -s | grep web_url | cut -d= -f2)`
2015-02-18T12:30:32.51-0500 [App/0] OUT [Wed Feb 18 2015 17:30:32 GMT+0000 (UTC)] INFO Using default redis on localhost:6379
Your bot is alive and should be seen joining the #general Slack channel. You can also invite it to other channels by doing the following in your Slack client:
/invite yourbotname
You should now see the bot join like this:
Awesome! You can now talk to it either in private messages or by asking it things, like “yourbotname help”. Now you should have a look at all the new and old Hubot scripts that can make your bot funny, useful or both :)
If you make any changes to your local repo for your bot, always make sure to do a “cf push yourbotname” after the local changes so you’ll get the online bot updated with those changes as well. But that starts to get old fairly quickly, and there should be a more efficient method of storing configurations and deploying them, right? Oh but of course there is! And we’ll cover all of that in Part 2, so for now, enjoy your new bot and have fun!


